Showing posts with label Homemade soap. Show all posts

Monday, April 30, 2012

Mother's Day Gifts

It's almost Mother's Day! It's time to get my crafting on... I needed a little inspiration so I stopped by Michaels Craft store a few day's ago. I ended up finding so many idea's it was hard to choose just one. I do have a passion for making soap so I grabbed a few soap supplies and some super cute paper while I was there. Then headed home to create a Mother's Day gift.

  I decided to make lavender oatmeal and apple heart soap. They turned out really cute and I am so excited to give them to my Mother!!


Supplies needed:

clear glycerin soap (Michaels)
white glycerin or goats milk soap (Michaels)
fragrance for soap (Michaels)
soap coloring
large plastic or glass measuring cup
tin foil
bread loaf pan or loaf sized container
mixing spoon
cheese grater
cutting board
knife
a small spray bottle filled with rubbing alcohol
oats- if you are going to make lavender oatmeal soap, I chose to use quick oats instead of regular because I wanted my oats to be a little smaller

**Michaels also carries soap making kits with all the soap supplies needed in them**

Start out by forming a piece of tin foil into a square by pinching the foil to create sides. I learned this on YouTube, super handy trick!
Place cut blocks of clear glycerin in a large measuring cup. Put the measuring cup into the microwave and microwave soap in 30 second increments, stirring every 30 seconds until the soap blocks are melted. Next stir in your color and fragrance, pour melted soap into foil form.


You want to wait until the soap is hard enough to form into a heart. Keep you eye on it because it hardens really fast. I had to re-melt mine a second time because I waited too long. Once it is firm enough to handle but still warm and flexible remove the foil. Trim a little off each end so that it fit's  into your form. Keep the extra soap that you trim off for later. Roll each end into the center to form a heart shape. Make sure that your finished heart is not taller than your form. Set aside.

Next get your cheese grater out and start shredding soap. I shredded a bar of white glycerin and the remaining soap that I trimmed off before I made my heart.

Next melt almost a whole container of white glycerin depending on the size of your form. I stacked cut bars of glycerin in my container to get an idea of how much I would need, don't forget to take in account the space that the heart will take up. To much is better than not enough. Pour a small amount of melted soap into the bottom of your form and place the heart into your form and hold in place until it stays by itself. Make sure your soap is not too hot or it will melt your heart and make a mess. Once your heart will stay in place spritz it with the alcohol to help the soaps stick together. Then fill the rest of your form until the heart is totally covered in soap. Make sure to pour your soap slowly so that it has a chance to fill the inside of the heart. Gently tap the container once it is full.

Spritz the top of the soap with alcohol again. Now sprinkle your soap shavings on top and gently press them into the melted soap so that they will stick when the soap cools.


Wait a few hours or even over night before removing soap log from form. If you used a plastic container gently pull sides of container away from soap, next turn the container upside down and put your hand underneath the container to catch the soap. Gently shake out the soap. If you are using a bread loaf pan run a knife around the edges before you turn it over and shake out the soap. It does help to put your soap into the freezer for a few minutes before trying to remove it from it's container. Some of the shaving from the top will fall off, that's normal.

Now you are ready to cut your soap, yea! Put your soap on a cutting board, trim off a small amount of each end first. Next cut bars into your desired thickness.

I had to take lots of pictures of my pretty soap when I was done, I am so proud of it! 


Here is the Lavender Oatmeal soap:)
  For this soap I used goats milk soap. I made 2 layers, one white and one purple. Make sure to spray the soap with alcohol between layers. I also added lavender fragrance, which smells really good. Sprinkle and press oats on to the top of the soap log before it cools.

Now for packaging....

The purple and silver polka dot paper is from Michaels and do I love it! I also grabbed small white paper bags from Michaels, they are in the wrapping section.
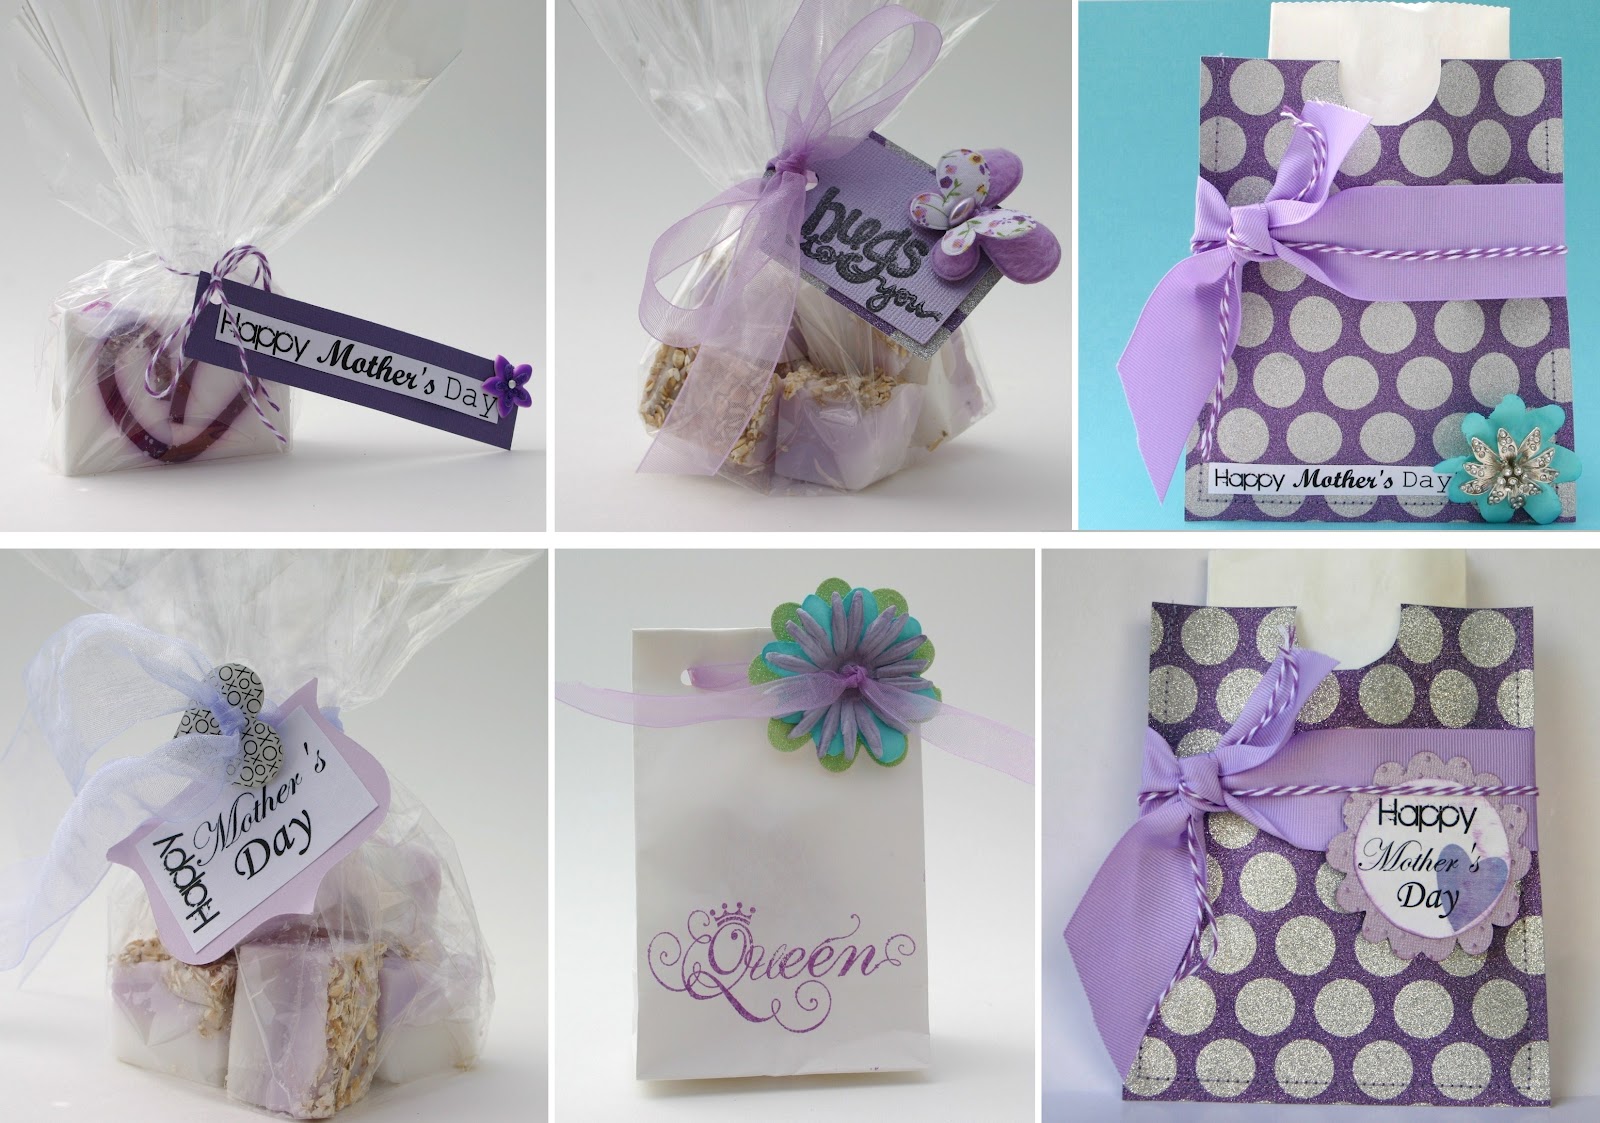
I saw a similar idea on Pinterest and decided it would be perfect to put my soap in. 
Cut your paper in your desired size and sew 3 edges making a paper pocket. Embellish however you want! These paper pockets would also be really good for chocolate candies, hint-hint. Don't all mother's love chocolate?!?

Happy Mother's Day
I hope someone spoils you too!

Wednesday, May 25, 2011

Apple Soap Teacher's Gift

The end of the school year is here all ready and it's time to make teachers gift's. If you are like me this is a very hard thing to do. I never know what to make or buy. My good friend came up with a brilliant idea to make apple soaps as gifts. She is brilliant I tell ya, brilliant. Of course we should make cute little apple soap to spoil my kids teachers. Okay so I think you get the point, I am very excited about this idea. So we got to it and came up with these cute little soap's. They even smell like apples!

Here is how you can make your own.

Supplies:
Glycerin Soap
Apple Soap Scent
Red & Green Soap Colors
Leaf Cookie Cutter
Small Round Containers

I picked up the bag of glycerin soap cubes from Hobby Lobby for $6.99, actually I used a 40% off so it was even cheaper than that. In the soap making isle at Hobby Lobby they also have scents and colors made especially for making soap. I picked up the leaf cookie cutter at Walmart. While I was there I also grabbed some zip-lock containers, pick containers that are the size you want your finished soaps to be.
 Start out by melting a few glycerin cubes in a large plastic measuring cup. Microwave in small increments. I usually start with 30 seconds and if that is not enough to melt the cubes I microwave them for another 10-20 seconds. This step should never take longer than 1 minute in the microwave. Once your cubes are melted add apple scent and red coloring.  I had this square soap mold from one of my other projects, you can use square containers or whatever you have hanging around that is square. Pour the melted soap into your mold. Fill the mold as full as you want your apples to be tall. I hope that makes sense. These are going to end up being your apples in the center of your soap so if you want skinny bars of soap pour your molds really shallow. Let the bars cool until they become solid. If you want to speed up this proses you can put the whole thing into the freezer for a few minutes. Just a heads up I made 4 red bars and only ended up using 1 1/2 bars to make apples for my 6 bars of soap.
 Once your soap is solid turn your mold over and pop your bars out. Slice the bars lengthwise and curl them into circles. If you do this step while the bars are still a little warm they are easier to curl.
 Next make some green soap. I used one of my kids small Ikea bowls to make a small green bar to cut leaves out of. Remove it from the bowl as soon as you can so that you will be able to easily cut through it with a cookie cutter.
 The soap got stuck in the cookie cutter so I used a Q-tip to help push it out.
 Place the leaves and apples into the bottom of your containers.

Next microwave more glycerin soap. This batch you are going to leave clear, do not color it. Do however add your apple scent to it. After you have melted more glycerin blocks in the microwave let them cool down for awhile before you pour it over your apples. I learned this lesson the hard way. The first apple I poured hot soap over and it melted my apple and made a mess. So let it cool down a little before you pour it over the soap and pour it slowly too. If you have a lot of bubbles in your soap take a spray bottle with rubbing alcohol and spray the top of the soap and the bubbles will pop. Once you have filled your mold place it into the freezer, this will help to not melt your apple. I only fill my molds full enough to cover my apple, you can fill yours as full as you like. Once the soap is set pop it out of its mold and voila cute little apple soap.
 

 I put my soap into zip bags then I whipped out some apple tags to tie onto them. You can also wrap your soap in plastic wrap instead of putting them into bags.

I sure hope my kids teachers enjoy them. 

I made these a few months ago. Click here if you want to see how I made them.

Tuesday, January 25, 2011

Dishwasher Detergent

Here is another one of my "sick of spending so much money on soap?", "tired of loading the dishwasher after dinner and finding you are out of dishwasher soap, again?". Save money and grocery store trips and make your own. It's really easy and last's forever!

Here is what you need.
 Dishwasher Detergent ingredients:
1 box Borax (4lbs 12 oz or 76 oz ) (2.15 kg) found in the detergent isle
1 box Arm & Hammer Super Washing Soda (55 oz or 3 lbs 7 oz) found in the detergent isle
24 packages of unsweetened lemonade drink mix, like kool-aid. (**Note: lemonade will stain soap dispenser yellow, another option would be to use citric acid instead of lemonade. You can usually find citric acid in the canning isle )
3 cups Epsom Salt
Lemi Shine rinse aid (this recipe does not work very well without it) You can find Lemi Shine in the dishwasher detergent isle at just about any store. You can also use vinegar as a rinse aid. If your dishes are coming out with spots on them that means you do need a rinse aid.


Use Lemi Shine as a rinse aid. It works wonders. Just sprinkle about a tablespoon in the bottom of your dishwasher before you start it. This stuff is awesome!!
If you want you could cut this recipe in half or even smaller to just try it out. You will still have to buy large boxes of Borax and Washing Soda which you can store for later use.
Mix Borax, washing soda, salt and lemonade together in a large, very large, bowl. When ingredients are mixed together well put soap in a container of your choice. I picked up a container at Walmart in the kitchen center with a pouring spout for $5.00 and it is big enough to hold an entire batch of dishwasher soap. The soap does get hard spots in it after a while so do be prepared for some hardening, I have not been able to get around that no matter what I do.

It even has a pouring spout to make things easy.

Use 1 tablespoon per wash cycle. It has no fillers so you do not have to use nearly as much to get the job done! This recipe is for hard water users, if you have soft water you may want to browse the internet for a better recipe for soft water.

Are you ready for the breakdown??
1 box of borax $4.69
1 box A & H washing soda $3.19
24 packages of lemonade $2.80
3 cups of salt $2.00, this one is a guess because I already had salt in my storage and who knows how much I payed for it.

Total= $12.68

1 tablespoon at a time........you tell me how long that's going to last.


To top off my project me and my Cricut got together :) and cut out letters from vinyl to label the container. Yes I know they are a little crooked but I am to cheap to buy transfer paper for all my vinyl needs, besides I am storing it in the cupboard under my sink. I tried my first load yesterday and was quiet impressed with how clean my dishes were. I hope it works well for you too!

Wednesday, November 3, 2010

Homemade Laundry Soap!!


Sick of buying laundry soap?? Me too. This stuff is awesome because it is way stronger then the store bought laundry soap. You only have to use 1 Tablespoon per load. This recipe makes a huge cookie jar full of soap and is going to last a life time, well maybe not quit that long. I originally made mine in July and I still have a ton and I do at least 8 loads of laundry ever week. So I am thinking it will last me almost a year. 1 year of laundry soap for less than $20, have I got you sold yet? I love not having to buy laundry soap all the time anymore. This laundry soap also works just fine in  HE washers. Update: **I just ran out of laundry soap and it is March. So July to March that's 9 months of laundry soap for $20 bucks. I am pretty happy about that.**


Here is what you need:
1 4 lb 12 oz box Borax (2.15 kg or 76 oz) found in the detergent isle

1 4 lb box Arm & Hammer Baking Soda (1.81 kg) found in the cooking isle

1  box Arm & Hammer Super Washing Soda 55 oz (3 lb 7 oz) found in the detergent isle

3 bars of Fels-Naptha soap, found in the detergent isle (if you use Zote bars use 2 bars instead, Zote can be found at Home Depot)

2 small containers of Oxy Clean or store brand Oxy Clean (try to get about 3.5 lbs total (1.58 kg)) found in the detergent isle.
(this is optional, I added it into mine because I have pretty messy kids and the cleaner the better)

You should be able to find all of these items at your grocery store.

**Use 1-2 Tablespoons per load. I know that does not seem like enough but this recipe does not have fillers like the store bought detergent so you only need 1-2 Tablespoons.**

This detergent is fairly mild smelling, it is not over powering. If you love a strong scent you may have to add a fabric softener or laundry crystals to each load. You can find laundry crystals in the detergent isle.

Start out by grating your Fels-Naptha soap just like cheese. You can use a food processor or just use your hand held grater, what ever you have. Those of you with an HE washer may want to run the mix through the grater again to get an even finer mix.
**Don't worry the Fels-Naptha will dissolve in your washer even if you only use cold water like me.**

Toss all ingredients in a 5 gallon bucket lined with a garbage bag. This part makes your whole house smell great. Once everything is mixed store soap however you like. The recipe makes
about 2 gallons worth of detergent. Walmart has large glass jars in the kitchen department.
I used a jar that my sister gave me a few years ago from a little home good store. Then used my Cricut to cut out the word Laundry to put on the front of the jar. I keep it above my washing machine, I also got a little scoop that is about 1 tablespoon to keep inside. Wasn't that easy? Sure was! Enjoy your soap.


 **If you are going to copy my recipe and blog about it please add a link back to my blog. Give credit where credit is due. It would be very appreciated. Thanks:)**


**Update** I have had a lot of repeat questions so I though I would answer a few here.

-This detergent is safe for HE washers. Just make sure to great your bar soap very fine.
  The detergent should be added to the barrel instead of the dispenser.
-This detergent is safe to use on sensitive skin.
-It does not have a strong scent, you can add laundry crystals to the batch to add fragrance.
-Some of my followers have used other bar soap instead of Zote or Fels-Naptha. I have personally not tried it but from the feed back I get it sounds like any bar will work.
-Use 1-2 Tablespoons per load.
-Walmart has nice big glass jars in the kitchen department!
-This is not safe for cloth diapers because it contains baking soda which affects how the diaper is able to soak up liquid. Or so I have been told. You may want to do your own research on this.
-I am not sure if this detergent is safe for a septic tank or not. I have had plenty of comments from people who have septic tanks and they say that this detergent works just fine.
- I used my Cricut to cut out the vinyl letters for the jar. I used the Story Book font.

Linked to:

Disclaimer:  Please use at your own risk.


Pin It

Tuesday, November 2, 2010

Fun Kids Soap


I had a great time making these and I think they turned out pretty cute!! Each soap has a fun little surprise in the center, my kids go nuts over these and they will be getting them as stocking suffers this Christmas.
I picked up my supplies at Hobby Lobby. I used a 40% off coupon for the soap, I choose the 5 lb bag and was able to make 30 soaps with it. I also picked up coloring and a scent (peppermint for Christmas). If you are going to use glitter choose the fines glitter you can because larger fleck glitter will all sink to the bottom of your mold (which will end up being the top of the soap when you are done). I got the bracelets and rings at good old Walmart in the party section. I also got small frogs, fish, and bouncy balls. You will also need a small spray bottle of rubbing alcohol.


I also picked up a mold at Hobby Lobby. I used this mold to make my colored soaps that will become the cubes to sprinkle in toy soaps.

As soon as you can pop them out chop them into little cubes.


I kind of got carried away and had to make every color I could!


To make the hearts I cut long strips of my pink soap and molded them into hearts. Place whatever "surprise" you want into each cup of a muffin pan.

Using a microwave safe measuring cup microwave glycerin soap as package directs. I only microwave two small blocks at a time and for 30 second increments. When I tried to do more than that I had to microwave it for longer (I am only talking 1 1/2 minutes) to get all the soap to melt and then the soap ended up to hot and it acted weird when I pored it into my molds. It melted all my colored blocks and sent them to the bottom of the mold and made a mess out of them. Also the soap dried very hazy. So only microwave 45 seconds tops. Before you pour the soap into your molds add glitter and fragrance. Stir to combine and then pour into molds making sure to fill each mold, don't do half full and then add more later. That does not really work very well either. Learn from my mistakes!! After you pour the soap into the mold immediately spray the soap with rubbing alcohol to pop all the bubbles, don't pass up this step it really works.


Don't move them while they are setting up. Allow them to set up completely (this only takes like 20 minutes or less) then pop them into the freezer for a few minutes (trust me this works). After a few minutes they pop right out. If you are having a hard time put them back into the freezer for a few more minutes and try again. I gently tapped on the back of each muffin cup to loosen the soap. BTW this did not ruin my muffin pan, its just soap it washes right out.


Cover each soap with plastic wrap and voila. Hand made soap. Stinking cute too. I might make stickers to go onto each soap or maybe put them into a cute cellophane bag to finish them up, they also fit nicely into a canning jar. Have fun, I sure did!

Stop by and enter Being Creatives 
{Back to School} giveaways!!
Click on the image below

back to top